
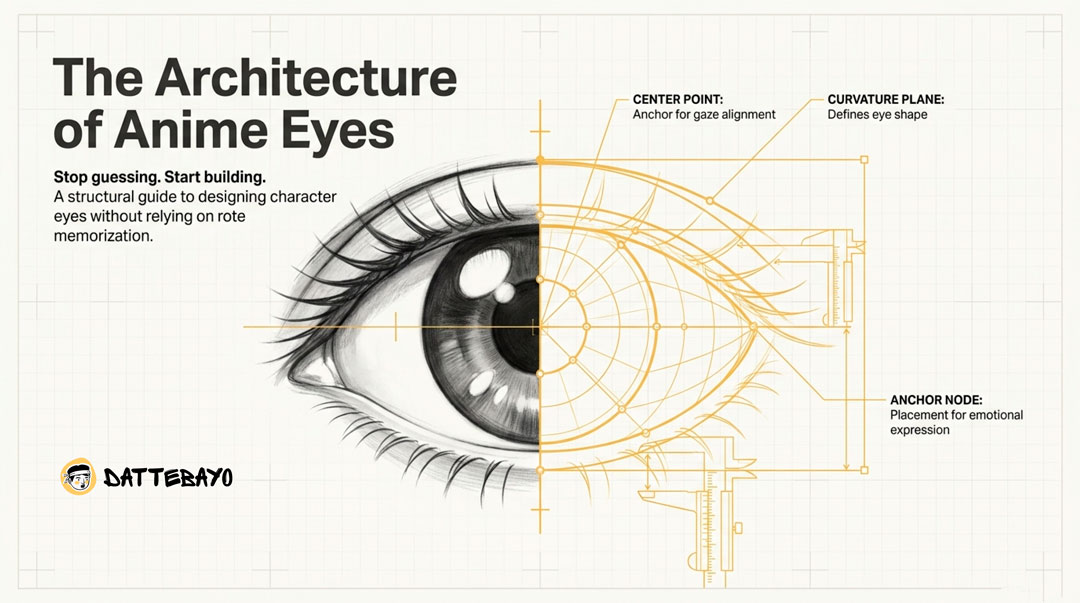
Anime eyes look simple—but they only work because there’s structure behind them. Once you understand that structure, you stop guessing and start making intentional choices.
This guide keeps things beginner-friendly while helping you actually understand what you’re drawing. No rigid “copy this line” instructions—just the key ideas that make anime eyes look right (and how to fix them when they don’t).
A simple step-by-step method to draw anime eyes (without overthinking it)
At its core, drawing anime eyes is about building a few elements in the right order: shape, iris, pupil, highlights, then refinement.
Think of it less as steps and more as layers of decisions:
- A clear outer eye shape (usually a stronger upper line, softer lower line)
- A large iris that often sits slightly under the top lid
- A centered pupil with one or two highlights
- Slightly thicker line weight on the upper lid
- Light shading to add depth
The goal isn’t perfection—it’s structure. Even rough sketches can look good if the structure is solid.
If something looks off, it’s almost always a structure issue—not a lack of talent.
If your early attempts feel stiff or uneven, that’s normal. You’re learning how the pieces connect, not memorizing a finished image.
To make this more intuitive, try adjusting the elements yourself:
Small adjustments here mirror what happens in your drawings—that’s how you build intuition faster.
What are the core parts of an anime eye?
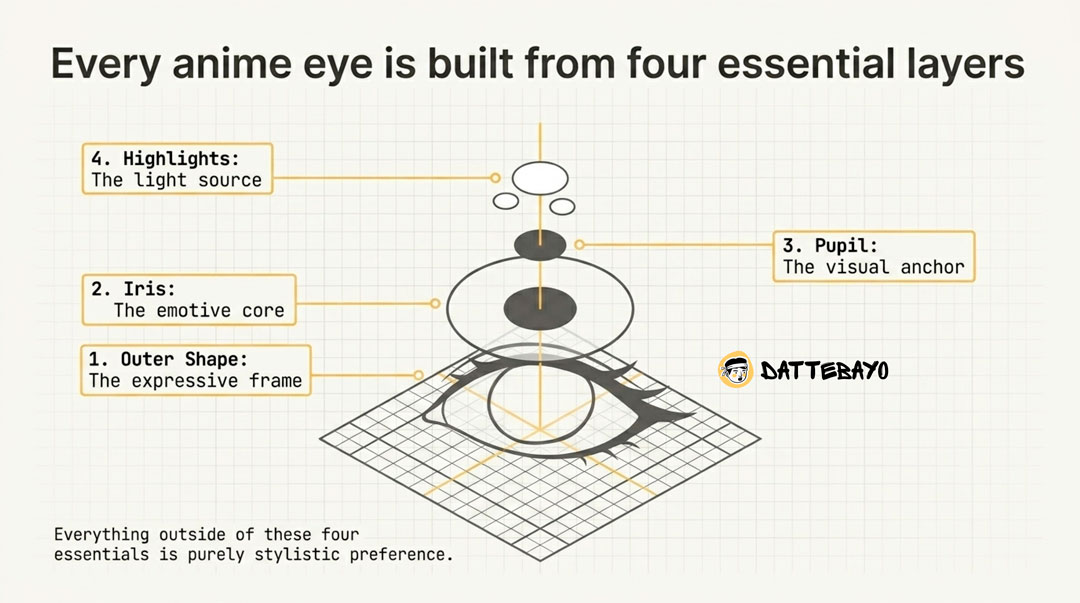
Every anime eye comes down to four essentials: shape, iris, pupil, and highlights. Everything else is style.
Once you understand these, you can simplify or exaggerate without breaking the design.
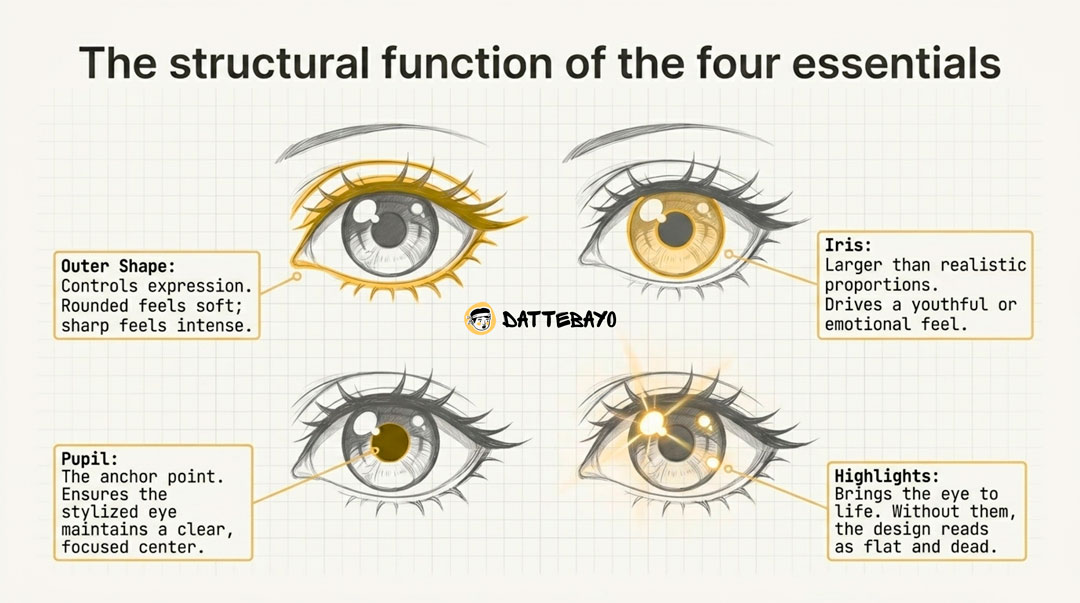
The 4 essential parts explained simply
- Outer shape. This controls expression. Rounded feels soft; sharp feels intense.
- Iris. Usually larger than realistic proportions. Bigger iris = more youthful or emotional feel.
- Pupil. The anchor point. Even stylized eyes need a clear center.
- Highlights. These bring the eye to life. Without them, everything feels flat.
You don’t need dozens of details—just these four working together.
Why copying tutorials doesn’t work long-term
Copying lines builds short-term memory, not understanding.
That’s why drawings fall apart when you stop referencing.
When you focus on construction instead:
- You can fix mistakes mid-drawing
- You can design original characters
- Your results become consistent
This approach is a big focus in structured learning on Dattebayo, where the goal is understanding first, not imitation.
Size, placement, and symmetry (why your eyes look “off”)
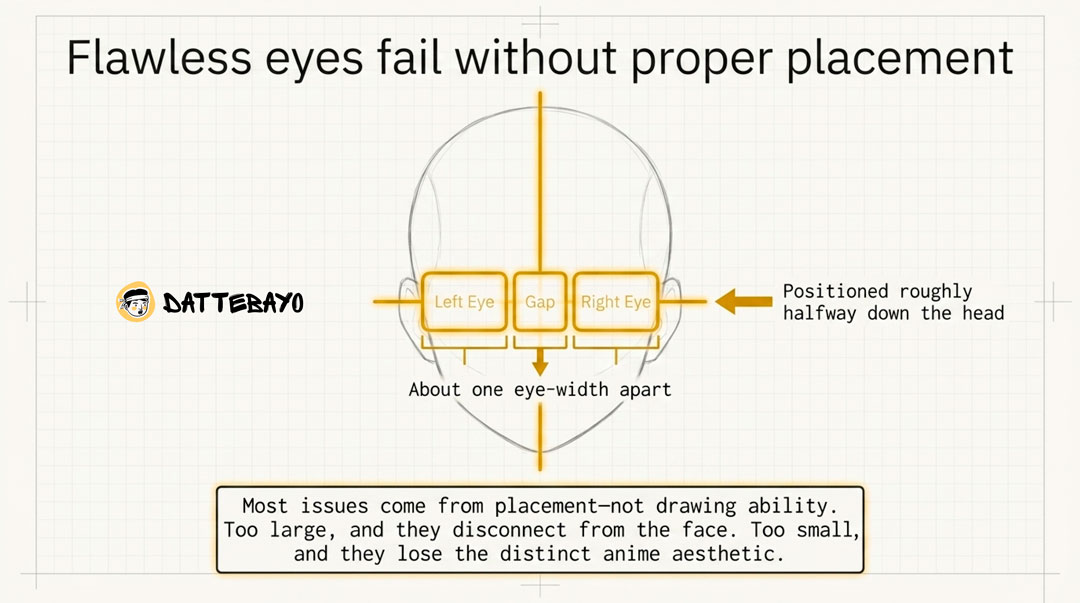
Most issues come from placement—not drawing ability.
Even well-drawn eyes will look wrong if they’re misaligned.
How big should anime eyes be?
They should feel stylized but still belong on the face.
Common problems:
- Too large → they feel disconnected
- Too small → they lose that anime look
The key is balance, not exaggeration for its own sake.
Where should eyes sit on the face?
They follow simple, consistent alignment rules.
- Positioned roughly halfway down the head
- About one eye-width apart
- Sitting on the same horizontal line
If this part feels tricky, it helps to review basic anime face proportions alongside eye practice.
How do you keep both eyes symmetrical?
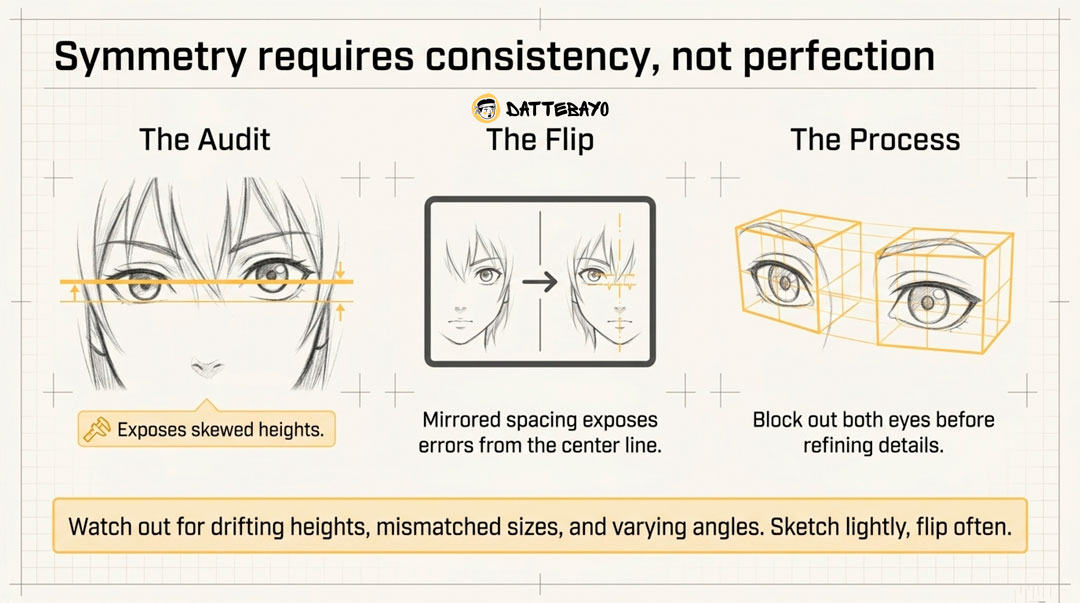
Symmetry is about consistency, not perfection.
Watch for:
- One eye drifting higher
- Different sizes or angles
Quick ways to check:
- Flip your canvas (or use a mirror)
- Compare spacing from the center line
- Sketch both eyes lightly before refining
Why your anime eyes look flat (and how to fix it fast)
Flat eyes usually lack contrast and intentional lighting.
You don’t need advanced rendering—just clearer value choices.
How do highlights create “life”?
Highlights represent light, not decoration.
Keep them:
- Consistent across both eyes
- Aligned with a clear light source
- Simple and intentional
One clean highlight is more effective than several random ones.
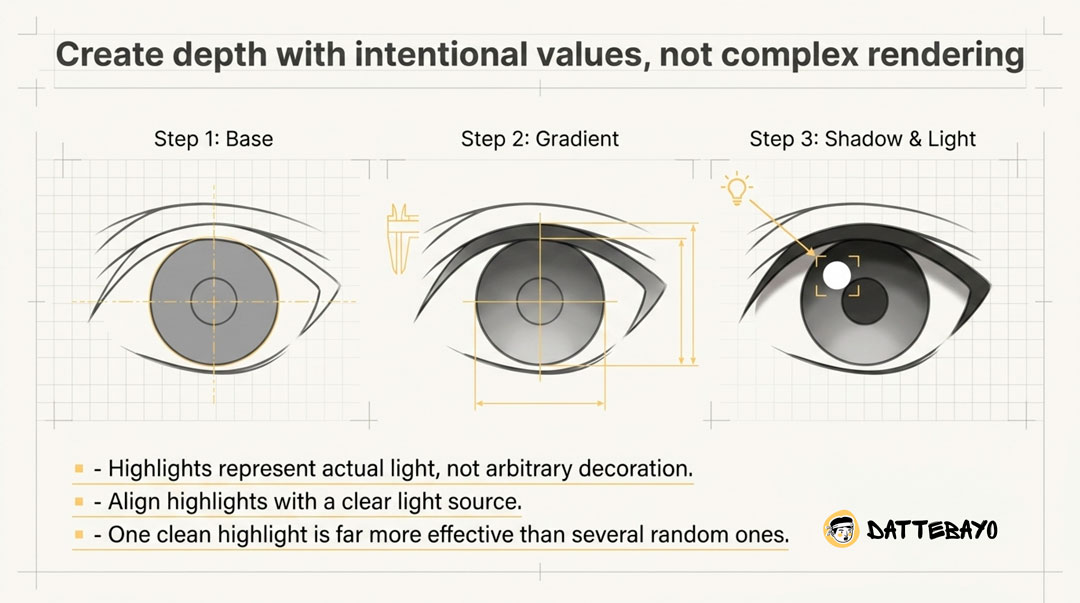
What simple shading adds depth?
A little goes a long way:
- Darker values near the top of the iris
- Lighter toward the bottom
- A soft shadow under the upper lid
That alone creates a sense of depth.
If you want to explore this further, basic shading concepts (like those taught in Dattebayo’s courses) can take you a lot further—but you don’t need them to get started.
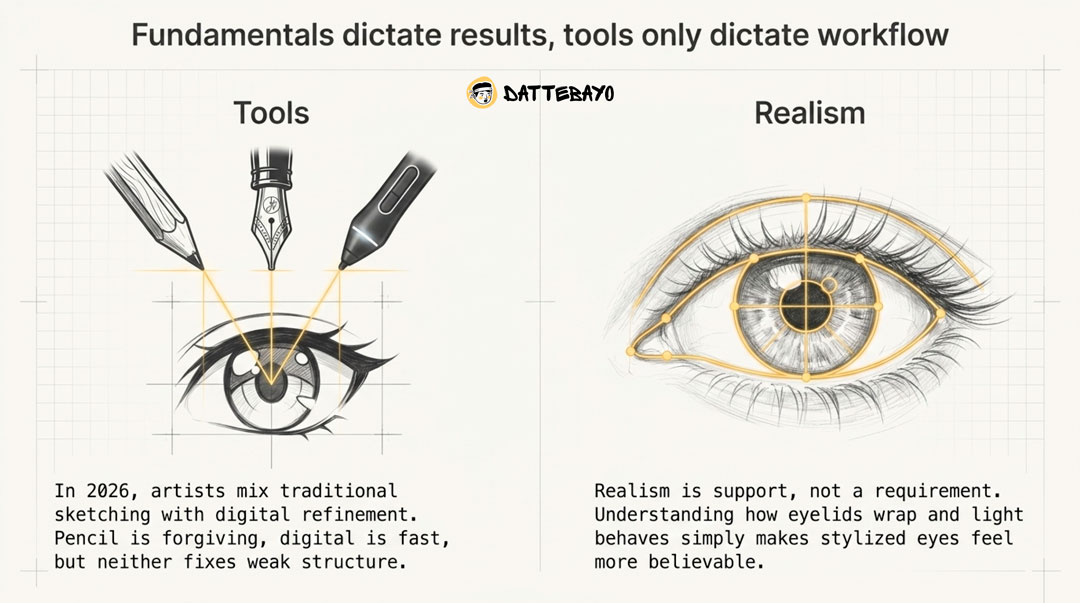
Do tools matter?
They affect results, but not your fundamentals.
- Pencil → forgiving, easy to adjust
- Ink → clean, confident lines
- Digital → fast edits and symmetry checks
Better tools won’t fix weak structure—but solid fundamentals work with anything.
Line weight, lashes, and small details that make a big difference
Subtle line variation can instantly improve your eyes.
These are small tweaks with a big visual payoff.
Why do thicker top lines look better?
The upper eyelid naturally casts a shadow, so thicker lines:
- Add depth
- Improve clarity
- Ground the eye visually
Thin, uniform lines tend to feel flat.
How should you approach lashes?
Keep them simple and intentional.
Two common styles:
- Minimal → slight flicks or thicker edges
- Stylized → sharper, defined lash shapes
Avoid:
- Drawing every single lash
- Turning them into cluttered spikes
Clean shapes always read better.
Different anime eye styles (and how to explore them)
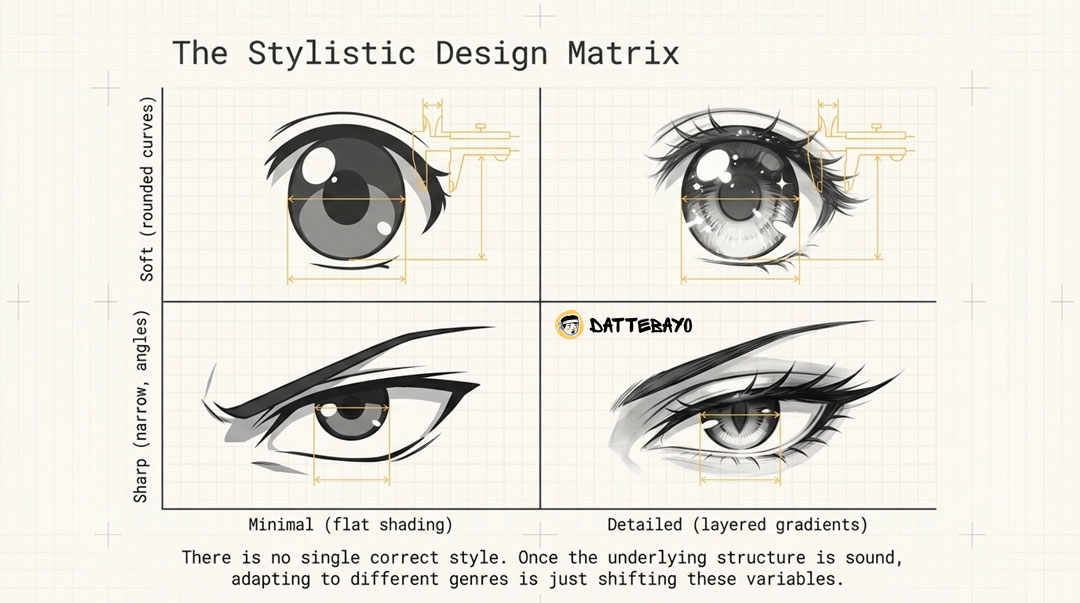
There’s no single “correct” anime eye—just different design choices.
Once you understand the basics, you can adapt freely.
What’s the difference between soft and sharp styles?
- Soft styles → rounded shapes, gentle curves, larger irises
- Sharp styles → narrower shapes, stronger angles
Even small changes in shape shift the entire mood.
Simple vs detailed eyes
- Minimal → fewer highlights, flatter shading
- Detailed → layered highlights, gradients, textures
Both work—it depends on your style and goals.
How do eyes show personality?
Eyes communicate character instantly.
- Large + bright → energetic, innocent
- Narrow + sharp → serious, focused
- Half-lidded → calm, bored, or tired
You’re not just drawing eyes—you’re designing expression.
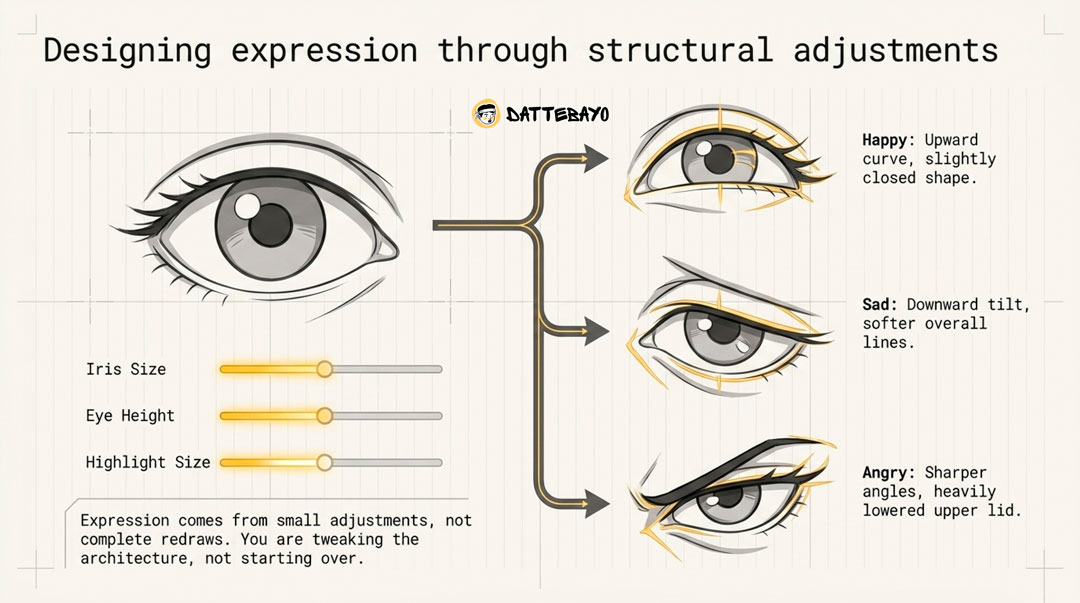
How to draw different eye expressions
Expression comes from small adjustments, not complete redraws.
You’re tweaking structure, not starting over.
How do happy, sad, and angry eyes differ?
- Happy → upward curve, slightly closed shape
- Sad → downward tilt, softer lines
- Angry → sharper angles, lowered upper lid
Even subtle changes can shift the emotion.
Subtle vs exaggerated expressions
- Subtle → closer to real-life behavior
- Exaggerated → stronger curves and contrast
Anime often leans exaggerated—but knowing both gives you control.
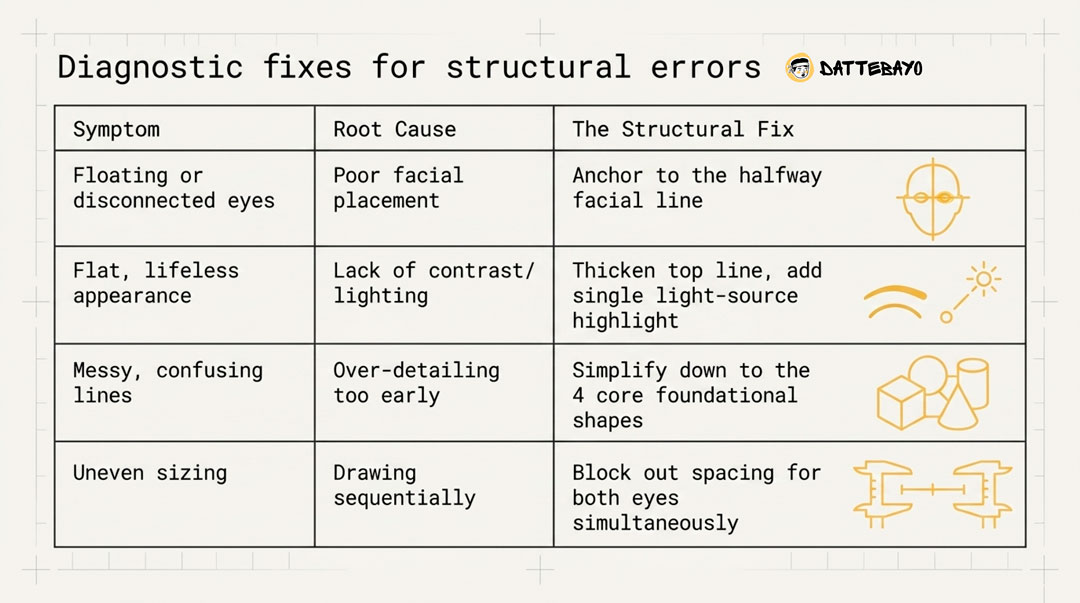
Common mistakes beginners make (and quick fixes)
Most mistakes trace back to structure.
A few quick fixes go a long way:
- Uneven eyes → check spacing early
- Flat appearance → increase contrast
- Messy lines → simplify before refining
- Too much detail → focus on core shapes first
- Random highlights → stick to one light source
- “Floating” eyes → fix placement on the face
Fixing these alone can noticeably improve your work.
What tools should you use (traditional vs digital)?
Start simple—tools are secondary.
What’s a good beginner setup?
- Pencil
- Eraser
- Paper
That’s all you need to build real skill.
Is digital drawing better?
It’s more flexible, not better.
- Easy corrections
- Layer control
- Symmetry tools
Many artists in 2026 mix both—sketching on paper, refining digitally—but the core thinking stays the same.
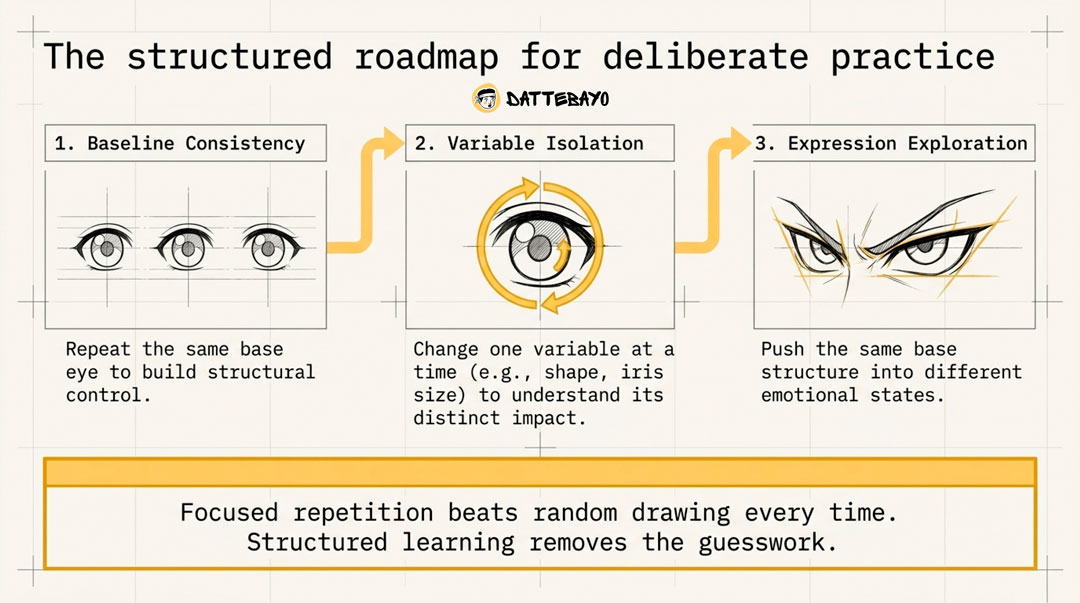
How to practice anime eyes and improve faster
Focused repetition beats random drawing every time.
Short, consistent sessions work better than long, unfocused ones.
What should you actually practice?
- Repeat the same eye to build consistency
- Change one variable at a time (shape, iris size, etc.)
- Explore different expressions using the same base
This builds control much faster than drawing random eyes.
Does structured learning help?
Yes—because it removes guesswork.
Instead of wondering what to practice next, you follow a clear path. That’s the idea behind Dattebayo: helping you progress step by step without confusion.
If you want a more guided approach, their anime drawing course walks through the fundamentals in a way that’s easy to stick with.
Do you need to learn realistic eyes first?
No—but a little realism helps.
You don’t need full anatomy studies, but understanding:
- how light behaves
- how eyelids wrap around the eye
- how the iris sits inside
…will make your anime eyes feel more believable.
Think of realism as support, not a requirement.
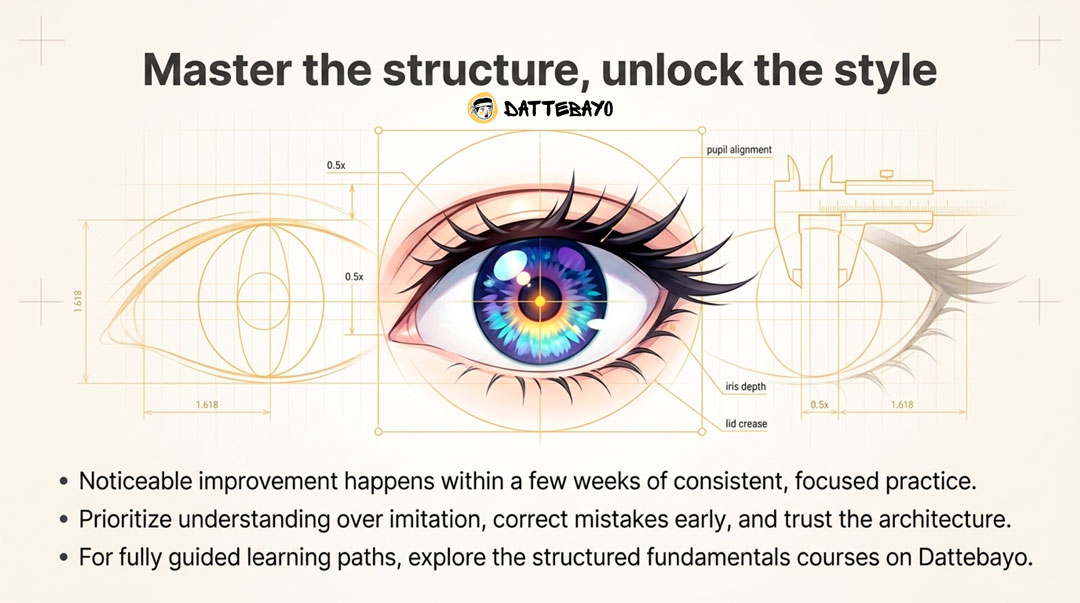
How long does it take to get good at drawing anime eyes?
You can improve noticeably within a few weeks of consistent practice.
What matters most:
- focused repetition
- understanding structure
- correcting mistakes early
With a structured approach—like the learning path on Dattebayo—you’ll improve faster simply because you’re practicing the right things.
FAQ
How to draw anime eyes step by step for beginners?
Start with a simple shape, add a large iris and pupil, include highlights, then refine with line weight and basic shading.
Why do my anime eyes look uneven?
Usually spacing or alignment issues—check placement before refining details.
Why do my anime eyes look flat?
They likely lack contrast and clear lighting. Add shading and intentional highlights.
How big should anime eyes be?
Stylized but balanced—they should fit naturally on the face.
How do you draw different anime eye styles?
Adjust shape, detail level, and line weight to create different looks.
How do you draw anime eyes digitally?
Use simple brushes and layers. The fundamentals stay the same.
What am I doing wrong when drawing anime eyes?
Common issues include poor placement, flat shading, inconsistent highlights, and over-detailing.
Do I need to learn realistic eyes first?
No, but basic understanding helps your drawings feel more solid.
How long does it take to improve?
With consistent, focused practice, you can see clear progress in a few weeks.