
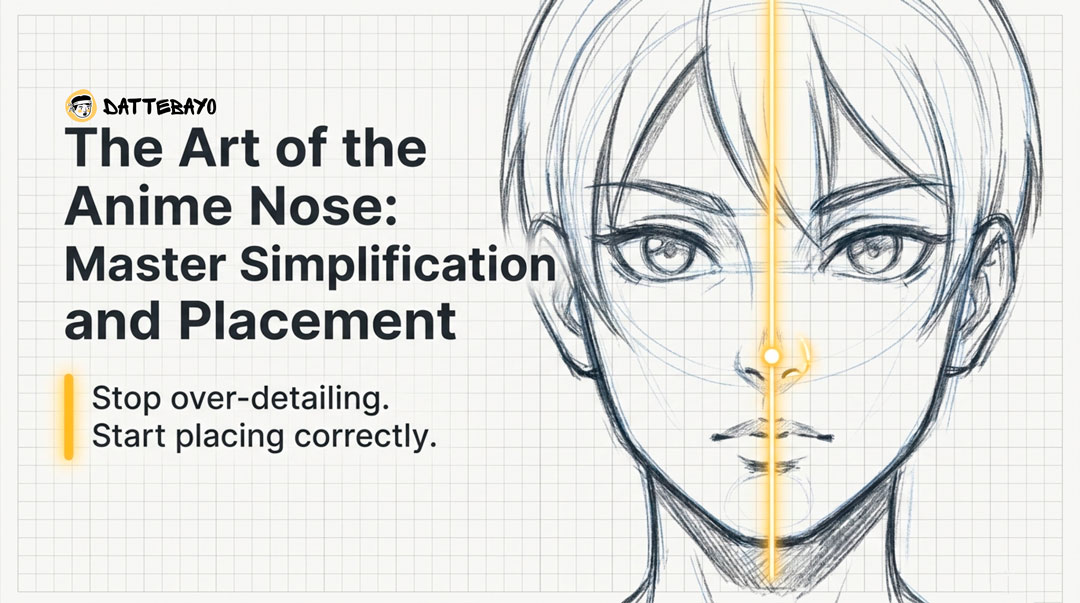
What is the easiest way to draw an anime nose?
Use a minimal mark (a short line, dot, or slight angle) and focus on placing it correctly rather than adding detail. That’s the idea most beginners overlook.
When people look up “how to draw anime nose,” they often expect something technical. In reality, anime noses are deliberately simple. The real challenge is decision-making—where you place the nose, how much you simplify it, and how consistently you apply that choice across your drawing.
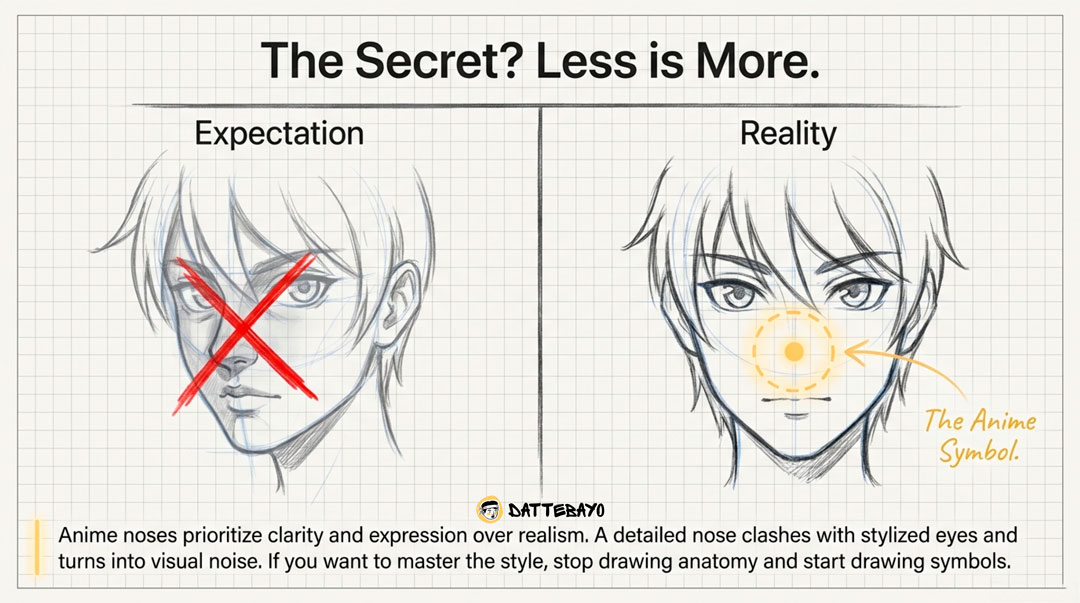
In anime and manga, the nose supports the face rather than standing out. The eyes carry most of the expression, so the nose stays subtle and unobtrusive. That’s why you’ll commonly see:
- A tiny dot for soft, cute characters
- A short line for neutral designs
- A small angled mark for slightly more structure
As soon as you start adding nostrils or heavy shading, the style can feel off.
A good anime nose is often barely noticeable—but always correctly placed.
Here’s a small tool to help you choose a nose style without overthinking:
A quick way to think about it
Find the face structure first, then place a minimal shape. That’s all you need to get started.
Instead of treating the nose as a separate feature, think of it as part of the overall face balance. If you’ve studied basic proportions—like in anime face proportions—this will feel familiar. The nose simply sits within that framework.
Why simple shapes work better than detailed noses
Because anime prioritizes clarity and expression over realism.
A detailed nose might look impressive on its own, but it often clashes with stylized eyes and simplified faces. On modern screens—phones, tablets, or web comics—too much detail turns into visual noise.
Clean, readable designs scale better, which is why even modern digital-first manga workflows (like those discussed in tools such as Clip Studio Paint) lean toward simplification.
So instead of asking, “How do I make this look realistic?” try asking:
- Does this match the rest of the face?
- Is it helping or distracting?
That shift alone makes a noticeable difference.
Where should you place the anime nose on the face?
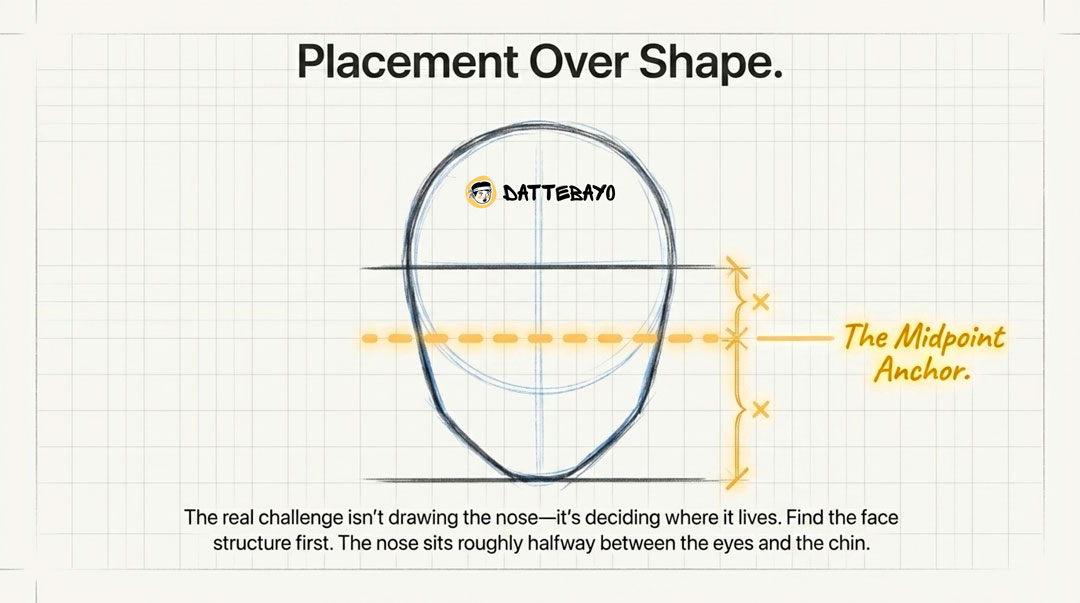
Place the nose roughly halfway between the eyes and chin, then adjust slightly depending on the angle and style.
This one idea fixes most beginner mistakes.
Even a well-drawn nose will feel wrong if it’s misplaced. Placement creates harmony; the shape just supports it.
Think of it like this:
- The eyes define the upper anchor
- The chin defines the lower anchor
- The nose sits near the middle of that space
A simple construction idea you can reuse
Use the eye-to-chin midpoint as your default anchor.
This works across most anime styles, from very minimal to slightly detailed. Once you get used to it, placing the nose becomes almost automatic.
If you’re already using guidelines (center lines, face divisions), the nose should fall into place naturally. If not, it’s worth learning those fundamentals—Dattebayo focuses heavily on this kind of clear, structured thinking so you’re not guessing every time.
Why your nose looks wrong even if the shape is right
Because placement errors stand out more than shape errors.
Common issues:
- Nose too close to the eyes → face feels compressed
- Nose too close to the mouth → face feels stretched
- Nose off-center → character looks unintentionally rotated
Most beginners try to fix this by changing the shape. In reality, a small shift in position usually solves it.
How anime nose shapes change with different angles
As the head turns, the nose becomes more visible and slightly more defined.
Instead of memorizing rules for every angle, think in terms of visibility. The more the face turns, the more of the nose’s structure you see.
Front view: why the nose almost disappears
Because you’re looking at it head-on, so depth is minimal.
In this view:
- The nose is often just a dot or tiny line
- Sometimes it’s not drawn at all
If your nose feels like it’s “missing,” that’s often correct for the style.
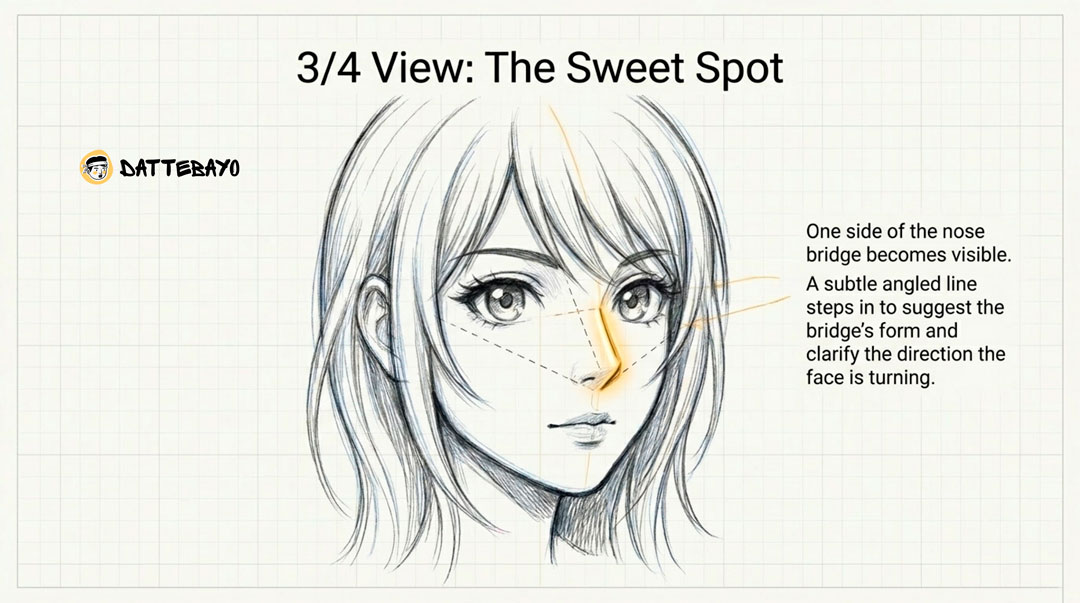
3/4 view: adding a bit of structure
Because one side of the nose becomes visible.
A small angled line works well here. It subtly suggests:
- The bridge
- The direction the face is turning
This is one of the most common views in anime because it balances simplicity and depth.
Side view: where form becomes clear
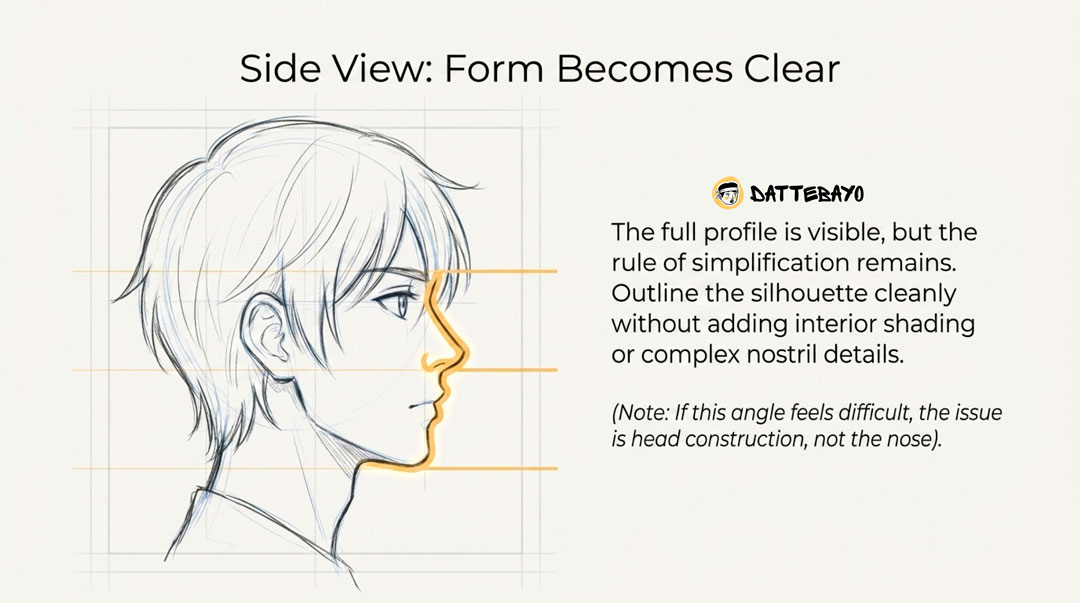
Because the full profile is visible.
Here you can show:
- The bridge
- The tip
- A hint of the underside
Even then, anime keeps things simplified compared to realistic drawing.
If this view feels difficult, the issue is often head construction rather than the nose itself. That’s why structured learning paths—like the one on Dattebayo—teach these together.
Why anime noses are so simple (and when they aren’t)
Because simplification improves readability—but detail increases when the style or mood calls for it.
Anime isn’t about copying reality. It’s about choosing what to include and what to leave out.
How simplification improves expression
It keeps attention on the eyes and emotions.
If every feature is equally detailed, nothing stands out. By simplifying the nose:
- The eyes become the focal point
- Expressions read faster
- Characters feel cleaner and more iconic
In anime, what you leave out matters as much as what you draw.
When to add more detail
When the character or scene needs it.
You might increase detail when:
- The character is older or more serious
- The shot is a close-up
- The style leans semi-realistic
Even then, it’s controlled. You’re not switching styles—you’re just adding a bit more structure.
What are the main anime nose styles (and when to use them)?
The most common styles are the dot, short line, angled mark, and lightly shaded nose—each tied to character design.
Think of the nose as part of your character’s visual language, not just anatomy.
Best nose styles for beginners
Start with the dot or short line.
They’re simple, flexible, and hard to overdo.
- Dot: ideal for cute or youthful characters
- Short line: works for most situations
They also keep your focus on placement instead of detail.
Matching nose style to your character
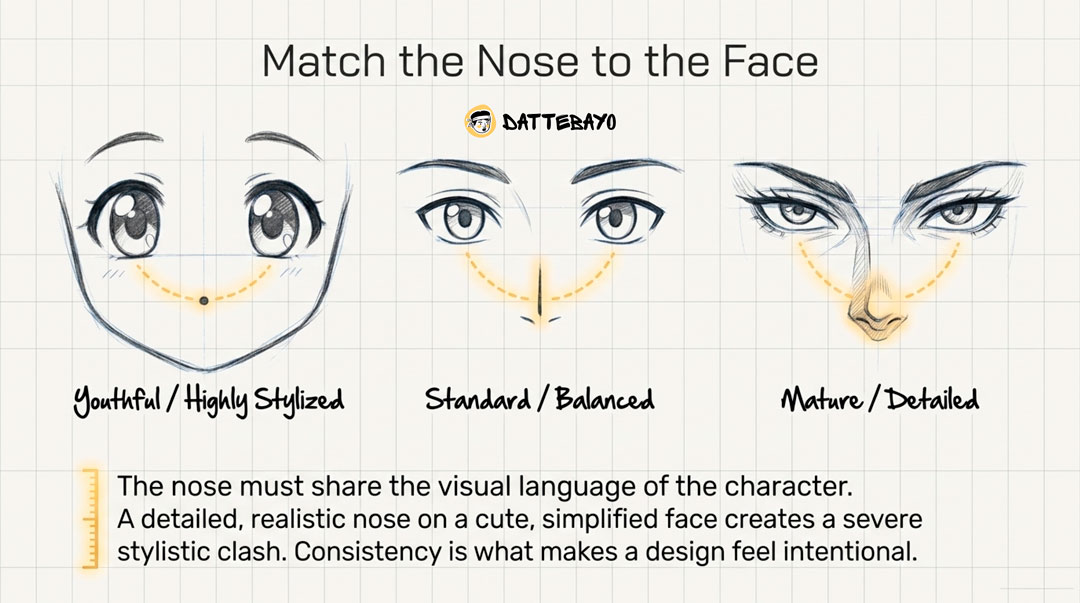
Your nose should match the rest of the face.
For example:
- Cute character → tiny dot or barely-there line
- Neutral character → short line
- Serious character → angled line or slight shading
Consistency is what makes a design feel intentional. A detailed nose on a simplified face will always feel out of place.
Common anime nose mistakes (and how to fix them)
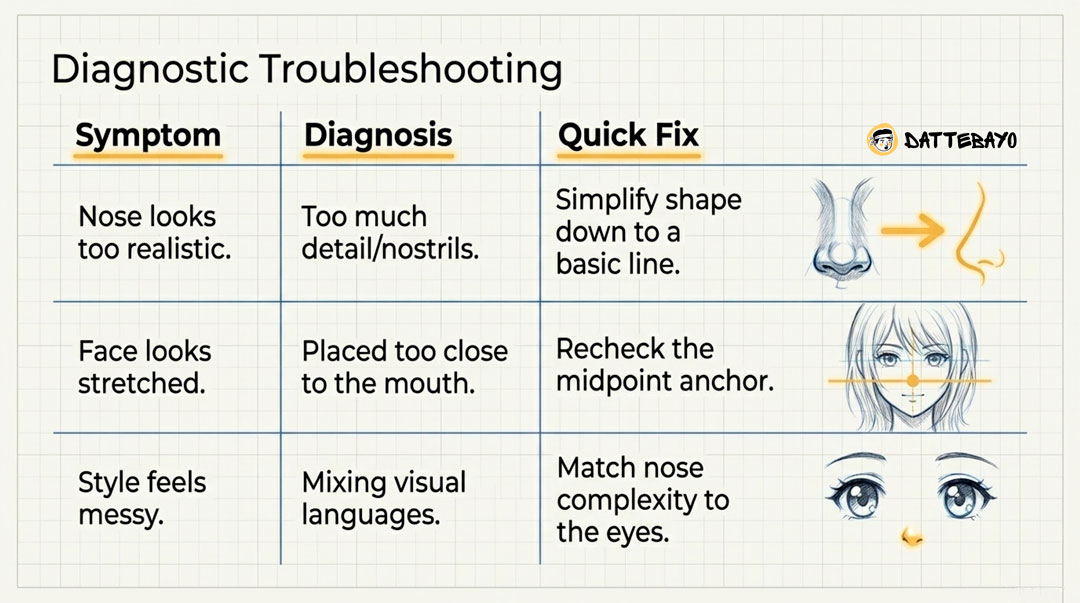
Most problems come from placement, over-detailing, or mixing styles.
Small adjustments here can dramatically improve your drawings.
The most common beginner mistakes
- Nose too high or too low
- Adding nostrils too early
- Over-shading
- Mixing realistic and stylized elements
Quick fixes that actually work
- Simplify the shape → remove extra lines
- Recheck placement → use the midpoint idea
- Stay consistent → match the rest of the face
If something feels off, don’t redraw everything. Adjusting or simplifying the nose is often enough.
How to practice and improve your anime noses
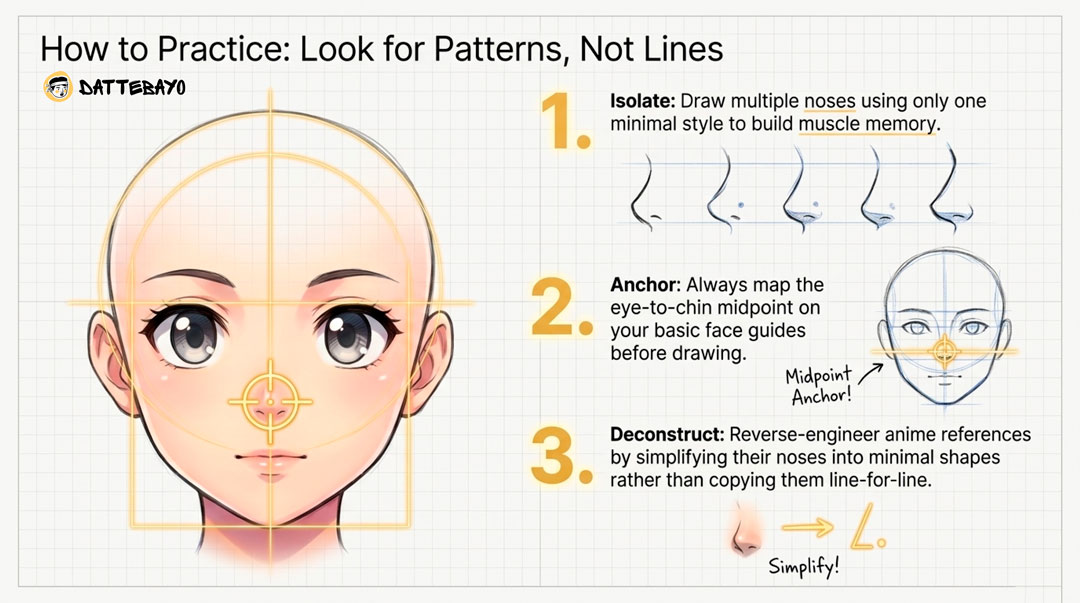
Focus on repetition, simplification, and consistency—not complexity.
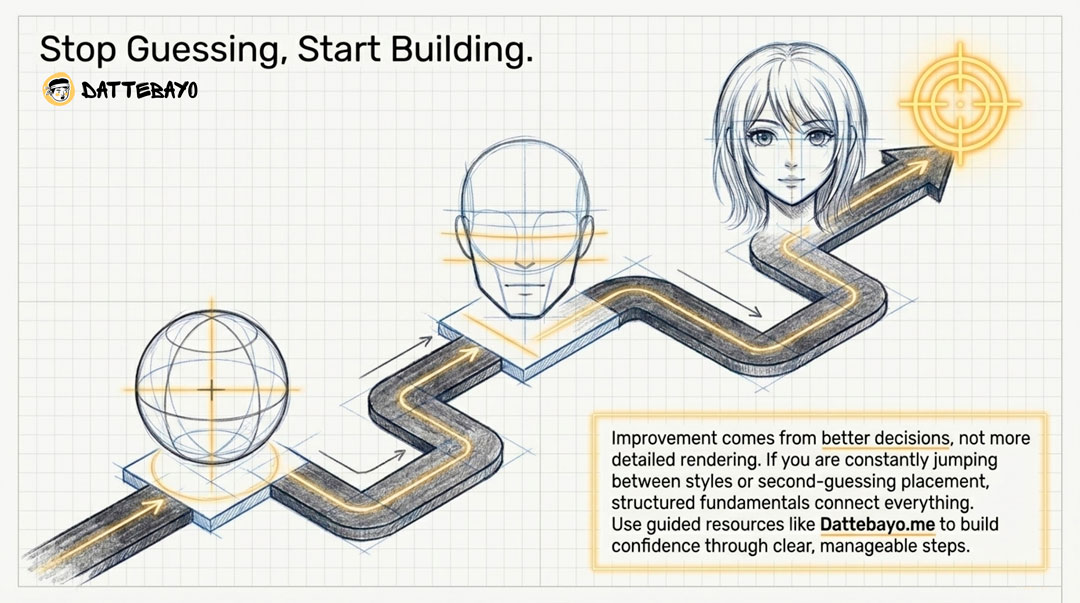
Improvement comes from better decisions, not more detailed rendering.
Simple exercises that build real skill
- Draw multiple noses using only one style
- Practice placing noses on basic face guides
- Simplify noses from anime references into minimal shapes
These train your eye to recognize balance and proportion.
How to study without copying
Look for patterns, not exact lines.
When observing anime faces, ask:
- Where is the nose placed?
- How simplified is it?
- What shape is being used?
This builds understanding you can reuse in your own characters.
When structured learning helps
When you want consistency and a clear path forward.
If you’re jumping between styles or second-guessing placement, a structured approach can help connect everything. Dattebayo focuses on making these fundamentals clear and manageable, so you’re building confidence instead of guessing.
You can explore more at dattebayo.me if you want a guided path.
Quick recap: anime nose cheat sheet
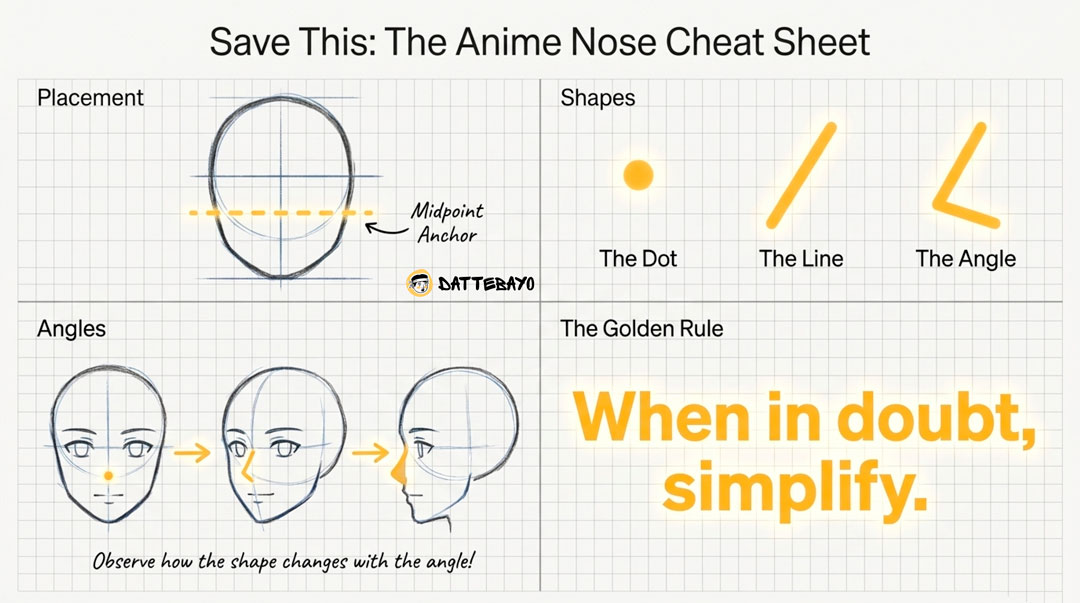
Anime noses are simple, placement-driven, and style-dependent. Keep them minimal and consistent.
- Placement: midpoint between eyes and chin
- Shape: dot, line, or slight angle
- Angles: more visible as the head turns
- Consistency: match the rest of the face
When in doubt, simplify. That’s usually the right call.
FAQ
What is the easiest way to draw an anime nose for beginners?
Use a small line or dot and focus on placing it correctly rather than adding detail.
Why does my anime nose disappear in front view?
Because front-view anime noses are often minimal or implied to keep the face clean.
Should I draw nostrils in anime style?
Usually no—nostrils are reserved for more detailed or semi-realistic styles.
How do I know where to place the nose on the face?
Use the midpoint between the eyes and chin, then adjust slightly for angle.
How do you draw an anime nose on a tilted head?
Keep it aligned with the face’s center line and follow the tilt of the head.
Why does my anime nose look off-center?
It’s usually misaligned with your face guidelines, not a problem with the shape.
What are the most common anime nose styles?
Dot, short line, angled mark, and lightly shaded variations.
Why does my anime nose look too realistic?
You’re likely adding too much detail compared to the rest of the face.
Do I need special tools to draw anime noses?
No—basic tools are enough. Control and placement matter more.
How can I improve without copying other artists?
Study placement and simplification, and use structured learning (like Dattebayo) to stay consistent.